Creating an MCP (Model Context Protocol) server in Python can empower your AI applications by providing a standardized way for large language models (LLMs) to interact with external tools and data sources. In this guide, we’ll walk through setting up your environment, writing your first MCP server in python using its SDK, and testing it locally.
What is MCP?
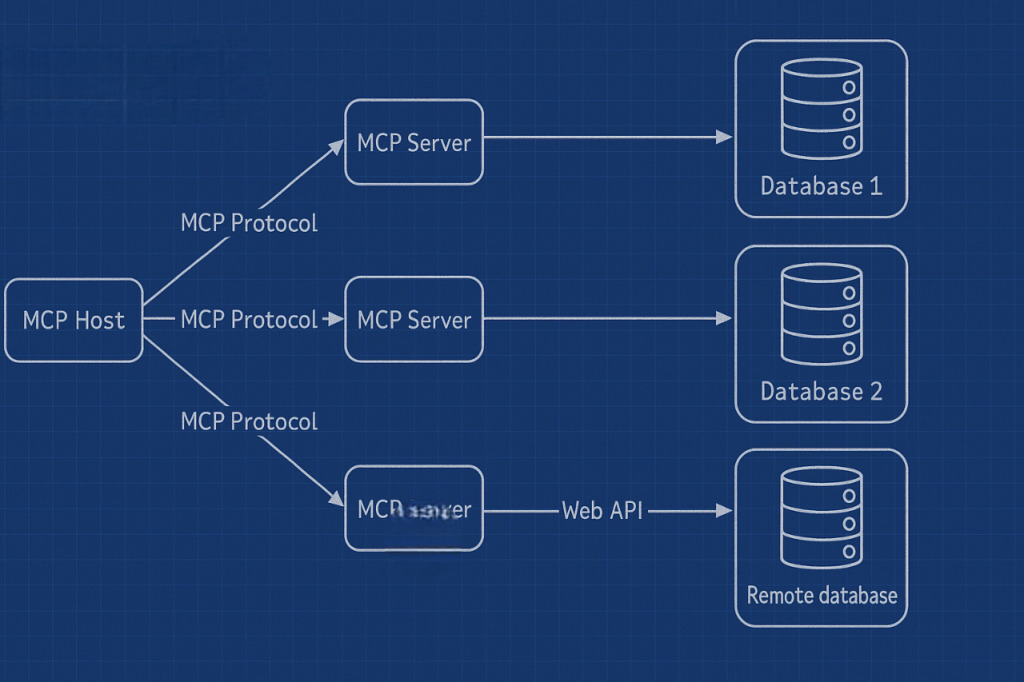
The Model Context Protocol (MCP) is an open standard that enables seamless communication between LLMs and external systems. Think of it as an API designed specifically for AI integrations: it exposes resources, tools, and prompts that allow models to perform actions or retrieve data in real time.
Think MCP is just like creating tools in agentic workflow libraries like LangGraph but with simplest approach. LangGraph requires to build flow from the scratch while MCP provides standard protocol for creating tools.
Prerequisites
Before you begin, make sure you have:
- Python 3.10+ installed.
- A basic understanding of Python programming.
- Pip for installing packages.
- (Optional) The uv package manager for faster project setup.
You’ll also need the official MCP Python SDK, which you can install via pip.
Setting Up Your Development Environment
- Create a Project Directory Open your terminal and create a new directory for your project:
mkdir mcp_server cd mcp_server - Set Up a Virtual Environment Create and activate a virtual environment to isolate your project dependencies:
- Windows:
python -m venv venv venv\Scripts\activate - Linux/Mac:
python3 -m venv venv source venv/bin/activate
- Windows:
- Install Dependencies Install the MCP SDK (including the CLI if desired) and any additional packages you need:
pip install mcp[cli]This command installs the MCP SDK along with its command-line interface tools, which help streamline server creation.
Building Your MCP Server in Python
We will create a simple MCP server that exposes a basic tool (for example, a calculator tool). This tool can later be extended or integrated with AI hosts like Claude Desktop or Cursor.
Step 1: Initialize the Server
Create a new file named server.py and start by importing the necessary modules and initializing the MCP server instance.
# server.py
from mcp.server.fastmcp import FastMCP

# Initialize a new MCP server with a name (e.g., "CalculatorServer")
mcp = FastMCP("CalculatorServer")
Step 2: Add Tools to Your Server
Tools are functions that the MCP server exposes so that clients (or LLMs) can invoke them. For this example, let’s create simple calculator tools.
import math

# Define an addition tool
@mcp.tool()
def add(a: int, b: int) -> int:
    """Add two numbers."""
    return a + b

# Define a subtraction tool
@mcp.tool()
def subtract(a: int, b: int) -> int:
    """Subtract the second number from the first."""
    return a - b

# Define a multiplication tool
@mcp.tool()
def multiply(a: int, b: int) -> int:
    """Multiply two numbers."""
    return a * b

# Define a division tool with error handling for division by zero
@mcp.tool()
def divide(a: int, b: int) -> float:
    """Divide the first number by the second."""
    if b == 0:
        return float('inf')
    return a / b
Each tool is decorated with @mcp.tool(), which registers the function with the MCP server. Docstrings help both with code readability and serve as metadata for clients to understand the tool’s purpose.
Step 3: Running the Server
Finally, add a main guard to run the server using the standard I/O transport. This allows your server to communicate via the command line or to be integrated with a client later.
if __name__ == "__main__":
    # Run the MCP server using stdio transport
    mcp.run(transport="stdio")
Your complete server.py should look like this:
from mcp.server.fastmcp import FastMCP
import math

# Initialize MCP server
mcp = FastMCP("CalculatorServer")

# Define tools
@mcp.tool()
def add(a: int, b: int) -> int:
    """Add two numbers."""
    return a + b

@mcp.tool()
def subtract(a: int, b: int) -> int:
    """Subtract the second number from the first."""
    return a - b

@mcp.tool()
def multiply(a: int, b: int) -> int:
    """Multiply two numbers."""
    return a * b

@mcp.tool()
def divide(a: int, b: int) -> float:
    """Divide the first number by the second."""
    if b == 0:
        return float('inf')
    return a / b

if __name__ == "__main__":
    mcp.run(transport="stdio")
Testing Your MCP Server
To test your server locally:
- Ensure your virtual environment is activated.
- Run the server from the terminal:
python server.py - You can simulate tool calls by sending commands through standard input or by using tools like the MCP Inspector for a graphical interface.
This setup allows you to see how the MCP server responds to tool invocations and provides a foundation for further expansion.
Conclusion
Building an MCP server in Python is a straightforward process that opens the door to robust AI integrations. With the MCP protocol, you can create standardized and secure interfaces for your AI models to interact with a wide range of tools and data sources. Start with this basic setup, and gradually extend your server’s functionality as you explore more advanced capabilities.
Happy coding, and welcome to the future of AI integrations!
For additional resources and community support, consider visiting the Model Context Protocol GitHub repository and joining relevant forums and discussion groups.
Also Read: Automating Sales Outreach with AI: Building an Agentic Workflow Using LangGraph