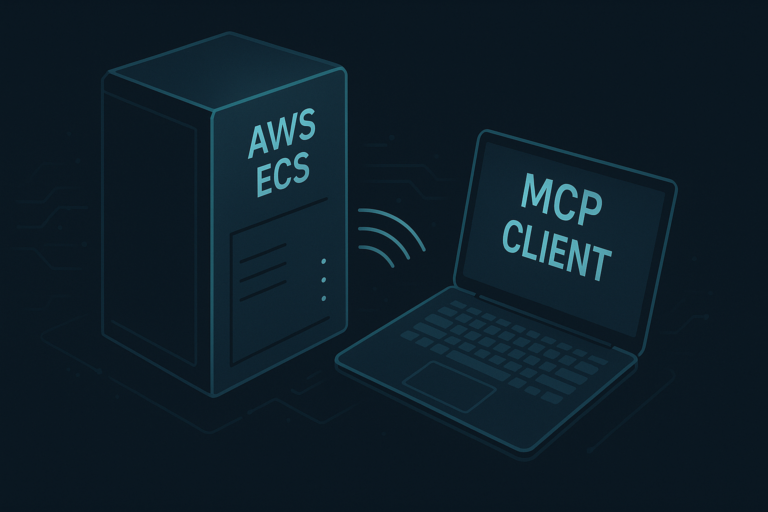
Deploying an intelligent tool-based server like MCP (Model Context Protocol) on the cloud opens doors to scalable, production-grade AI workflows. In this tutorial, you’ll learn exactly how to containerize and deploy your own FastMCP-powered MCP Server on AWS ECS (Elastic Container Service) using a lightweight, efficient stack—including FastAPI, Docker, UV, and ECR.
Prerequisites
Before jumping into the tutorial, let’s quickly set up a few things you’ll need. Make sure you’ve got the following ready:
- AWS CLI
Since we’re going to deploy on AWS, make sure you have set everything up on your machine with your configuration. If you haven’t done that yet, feel free to follow this tutorial to get started.
- Docker For Desktop
Make sure you also have Docker installed on your machine. This will be used to dockerize your application.
- UV for Python
UV is a super-fast Python package installer, so go ahead and install it from here.
Creating a Sample MCP Server
For the demo purpose, we are going to create an MCP server with weather and additional tools using FastMCP.
If you’re new to FastMCP or UV and want to learn how to build an MCP server and client with it, I highly recommend checking out this article first before jumping into the deployment process.
Here, I’ll initialize the project using UV.
PS D:\\mcp_demo> uv init
PS D:\\mcp_demo> uv venv
PS D:\\mcp_demo> .\\.venv\\Scripts\\activate #for windows

source .venv/bin/activate #For Mac or Linux
Installing the necessary packages.
uv add fastmcp requests fastapi
Now, set up the MCP server in main.py.
#import packages
from fastmcp import FastMCP
import requests
from fastapi import FastAPI
#initiate instance of MCP
mcp = FastMCP(name= "Hello MCP")
#create tools
@mcp.tool()
def add(x:str,y:str):
"""Adds two numbers"""
return x + y
@mcp.tool()
def get_weather_by_city(city_name: str):
"""
Fetches current weather information for a given city using OpenStreetMap Nominatim and Open-Meteo APIs.
Returns a dictionary with temperature, windspeed, and weather code.
"""
# Step 1: Get latitude and longitude from city name
geo_url = "<https://nominatim.openstreetmap.org/search>"
geo_params = {"q": city_name, "format": "json", "limit": 1}
geo_resp = requests.get(geo_url, params=geo_params, headers={"User-Agent": "weather-app"})
if geo_resp.status_code != 200 or not geo_resp.json():
return {"error": "City not found"}
geo_data = geo_resp.json()[0]
lat, lon = geo_data["lat"], geo_data["lon"]
# Step 2: Fetch weather using Open-Meteo
weather_url = (
"<https://api.open-meteo.com/v1/forecast>"
f"?latitude={lat}&longitude={lon}¤t_weather=true"
)
weather_resp = requests.get(weather_url)
if weather_resp.status_code == 200:
return weather_resp.json().get("current_weather", {})
else:
return {"error": f"Failed to fetch weather: {weather_resp.status_code}"}
#Wrap it in FastAPI
mcp_app = mcp.http_app(path='/mcp')
app = FastAPI(lifespan=mcp_app.lifespan)
app.mount('/mcp-server',mcp_app)
#add healthcheck endpoint
@app.get('/health')
def health_check():
return {"status":"healthy"}
if __name__=='__main__':
#Make sure transport is streamable-http.It is mandatory for running MCP remotely.
#transport = 'stdio' is suitable for local MCP.
mcp.run(transport="streamable-http",host='0.0.0.0')
Our demo server is now ready! If you’d like to test whether it’s working, you can do so using AWS Strands or LangGraph. Check out this article to learn how to run the test.
Create a Dockerfile for Deployment
Now, we’ll create a Docker file. That includes all the necessary commands to build a Docker image for our MCP server. So, create a file name Dockerfile and put the following content.
FROM --platform=linux/arm64 python:3.12-slim-bookworm

COPY --from=ghcr.io/astral-sh/uv:latest /uv /bin/uv

WORKDIR /code

COPY pyproject.toml uv.lock /code/

RUN uv sync

COPY . /code/

EXPOSE 8000

ENTRYPOINT ["uv", "run", "uvicorn", "main:app", "--host", "0.0.0.0", "--port", "8000"]
Now, build the Docker image using the following command. I am creating the image with the name mcp.
PS D:\\mcp_demo> docker buildx build --platform linux/arm64 -t mcp .
As you can see, I’m building the image for the arm64 Linux architecture, since AWS ECS is compatible with arm64 instances.
Testing Docker Image(Optional)
If you want to test out your created Docker Image, run the following command.
PS D:\\mcp_demo> docker run -p 8000:8000 mcp
This command should run the uvicorn, and you will be able to see your app on HTTP://localhost:8000.
Create a Repository on ECR
Now to push the image to AWS ECR. Follow these instructions:
Step 1: Go to Amazon ECR on AWS.
Step 2: Go to Repositories and click on Create Repository

Give the name to your repository. I am giving mine as mcp.
Step 4: Now, follow the Push commands and push your Docker image to ECR.
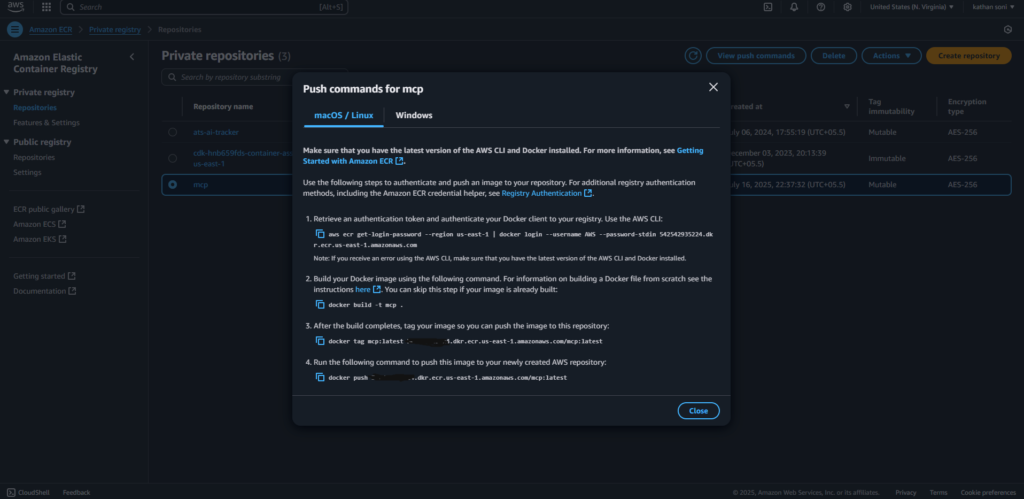
NOTE that we have already built the docker image above, that’s why skip the 3rd point(docker build -t mcp .) .
After following the push commands, you will be able to see your Docker image on ECR.
Create a Task Definition
Now we’re ready to create a task definition and set up a cluster for it on AWS ECS.
Step 1: Go to Task Definitions on Amazon Elastic Container Service and click on Create new task definition
Step 2: Give your task a name. Here I am giving my task name mcp_task . The Infrastructure requirements are as follows.
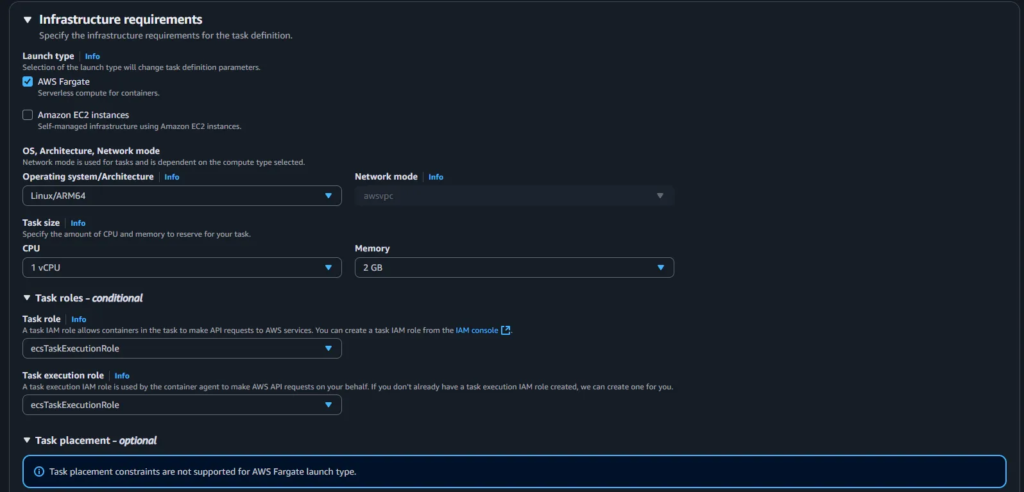
Since we’ve built the image for ARM64, the operating system will match that architecture. Here, I’m using 1 vCPU and 2GB of RAM, as the MCP server tool is lightweight and doesn’t require heavy processing.

Enter your ECR image URI and assign a name to your container. In the Port Mappings section, make sure to specify the port 8000, as that’s the port exposed by the Docker image.
Step 3: Click on Create
Now that we’ve successfully created the task definition for our MCP server, let’s go ahead and create a cluster and run the task as a service.
Create a Cluster and Task on ECS
Step 1: Go to Clusters and create one cluster with the default settings.
Step 2: Go inside a created cluster and click on create inside the Services tab.
Step 3: Select the name of your task definition from the dropdown. (mine is mcp_task).

Since I don’t need load balancing or any additional configurations, I’ll create the service using the default settings. However, feel free to customize the setup based on your server’s requirements.
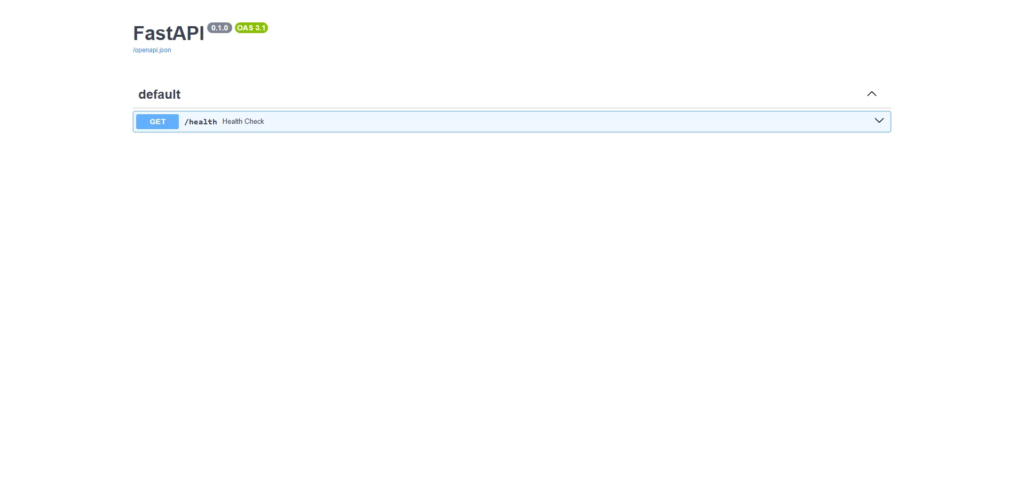
Now your ECS service is ready. Now go to your task’s configuration tab and grab the public IP. (Get the IP of the Load balance if you have used it.). Open it with 8000 port and see the \\docs . You will be able to see our health API there.
If you’re unable to access the URL, make sure to double-check the inbound and outbound rules in your security group. Ensure that all traffic is allowed.
Test Our Deployed MCP Server on ECS
For testing, I’ll use the AWS Strands library to create an MCP client and connect it to the public IP of the MCP server on AWS ECS instance.
Install it if you haven’t done it.
uv pip install strands-agents
from mcp.client.streamable_http import streamablehttp_client
from strands.tools.mcp import MCPClient
from strands import Agent

streamable_http_mcp_client = MCPClient(lambda: streamablehttp_client("<http://0.0.0.0:8000/mcp-server/mcp>")) #replace the URL with your ECS public IP

with streamable_http_mcp_client:
   agent = Agent(model="us.anthropic.claude-3-5-sonnet-20241022-v2:0",tools=streamable_http_mcp_client.list_tools_sync())
   response = agent("Tell me the weather of New York. Also add 5 celsius in the temprature and give me the resultant temprature.")
## OUTPUT
I'll help you get the weather in New York and then add 5 to the temperature. Let me break this down into steps:

1. First, let's get the weather for New York:
Tool #1: get_weather_by_city
2. Now, let's add 5 to the current temperature of 30.7°C:
Tool #2: add
Current weather in New York:
- Temperature: 30.7°C
- Wind Speed: 8.7 m/s
- Weather Code: 3 (partly cloudy)

After adding 5°C to the current temperature:
The resultant temperature would be 35.7°C
As you can see, it’s giving the output from our hosted MCP server on AWS ECS.