
A machine learning pipeline consists of multiple data extraction, preprocessing, and model-building steps. It helps to automate processes that are required in model building. Pipeline helps to include all steps of preprocessing, feature selection, feature extraction, model selection, and model building In one entity. Here we will see how to make a pipeline in machine learning.
Why do we need a pipeline in machine learning?
In Applications where you need multiple machine learning models then, in that case, this pipeline will help you a lot.
Pipelines save a lot of time because you don’t have to write the same lines of code again and again for preprocessing and all. Just make the pipeline only one time and use that whenever you want.
Most Organizations use pipelines in their machine learning-related tasks.
So it is better to make a pipeline in ML projects.
How to create a Pipeline in Machine learning?
By using Pipeline which is provided by sklearn.pipeline, you can create some fantastic pipelines.
You can create the simplest pipeline or complex pipeline as per your need. Here I provided all kinds of pipelines.
Remember that in the pipeline, you must have to make a list of tuples. And In the last step, you must add only the model otherwise it will throw an error.
Example 1: Simple Pipepline
In the simple pipeline, we are going to scale all features and apply logistic regression to the dataset.
from sklearn.pipeline import Pipeline
from sklearn.preprocessing import StandardScaler
from sklearn.linear_model import LogisticRegression
from sklearn.datasets import make_classification
from sklearn.model_selection import train_test_split

X,y=make_classification(n_samples=1000)
step=[('scaler',StandardScaler()),('classifiler',LogisticRegression())]
pipe=Pipeline(step)
X_train, X_test, y_train, y_test = train_test_split(X, y, test_size=0.33, random_state=42)
pipe.fit(X_train,y_train)
y_pred=pipe.predict(X_test)
print(y_pred)
Here when you execute pipe.fit on training data, it will first scale the training features using StandardScaler and will apply LogisticRegression on it.
Example 2: Mid-level Pipeline
In this example, we will apply a standard scaler, PCA, and then will fit the SVC model on the dataset that we generated in the first example.
from sklearn.decomposition import PCA
from sklearn.svm import SVC
steps=[('scaling',StandardScaler()),
       ("PCA",PCA(n_components=3)),
       ('SVC',SVC())
]
pipe2=Pipeline(steps)
You can also call a specific library from the steps. Suppose you want to use only StandardScaler on training features then you have to call by pipe[‘scaling’].fit_transform(X_train).
pipe2['scaling'].fit_transform(X_train)
pipe2.fit(X_train,y_train)
pipe2.predict(X_test)
Example 3: Complex Pipeline
In this example, we’ll create two pipelines. One is for numeric columns and the second one is for categorical columns.
from sklearn.impute import SimpleImputer
import numpy as np

from sklearn.preprocessing import OneHotEncoder
cat_processor=Pipeline(
     steps=[('imputation_const',SimpleImputer(fill_value='missing',strategy='constant')),
     ("onehot",OneHotEncoder(handle_unknown='ignore'))
     ]
 )
numeric_processor=Pipeline(
     steps=[('imputation_mean',SimpleImputer(missing_values=np.nan,strategy='mean')),
     ("scaler",StandardScaler())
     ]
 )
Now we will combine them with the ColumnTransformer library.
preprocessor=ColumnTransformer(
    [('categorical',cat_processor,['gender','city']),
     ('numerical',numeric_processor,['age','height'])
     ]

)
Here the first argument in the named tuple is the name that you give to the step. The second argument is the variable name of the step. And on the third argument, you have to pass the feature names on which you want to apply the pipeline’s steps.
Now use make_pipeline from sklearn.pipeline to apply steps and fit the dataset on the model.
final_pipe=make_pipeline(preprocessor,LogisticRegression())
Now you have to just call fit and predict on final_pipe. Easy Right?
Also Read: Deploy Flask app using docker and GitHub actions on Heroku
Bonus Tip:
If you are unable to understand how the pipeline is working in which order, then do:
from sklearn import set_config
set_config(display='diagram')
Now you have to print the last variable name of the pipeline and you will see the visual representation.
For Example, if you print the final_pipe pipeline from the third example, you will see this:
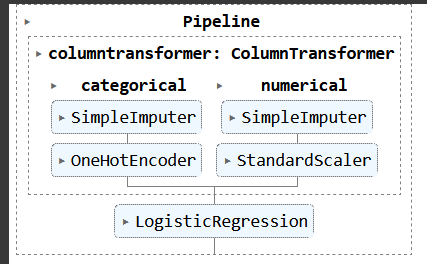
So that’s how you can create some amazing pipelines in machine learning projects using sklearn. If you have any doubt regarding this, then feel free to comment.